If you’re going to use a Ford Raptor Winch Bumper, there are some additional steps to take. The following guide will show you how to install a winch-compatible intercooler kit. For this example, Full-Race’s intercooler kit will be used.
PREPARATION
- This entire job can be performed with the truck on the ground - No need to raise the vehicle. The most difficult part is removing the grille shutters. Once you are familiar with the process, the installation can be completed in 2 to 3 hours.
- Minimum tools required:
- 7mm Socket
- 8mm Socket
- 10mm Socket
- 11mm Socket
- 13mm Socket
- 15mm Socket
- 6” Socket Extension
- 12” Socket extension
- T-27 Torx
- Flatheadscrewdriver or clip removal tool
- E6 External Torx (only required if relocating adaptive cruise module)
- A plastic cutting device such as a cut off wheel, reciprocating saw or similar.
INSTALLATION
- Start by opening the hood and disconnecting the battery.
- Unplug IAT sensor after airbox. Using a 7mm socket, loosen clamps and remove Intake tube from air box.

- Remove the clips holding the Grill cover and intake inlet. Gently pry the center up until it unlocks, then pull on the larger round base to remove. Save clips for later – do not lose them.

- Remove clip from the top of the headlight surrounds, there will be one on each side. Remove four 10mm bolts that hold grille assembly to core Next, unplug the electrical connections by the hood latch.

- Gently pry on headlight surrounds by hand only, starting from the side closest to the grill. They don’t have to be removed entirely, but it will make grill removal and installation easier.

- Remove 3 christmas tree clips from each side of grille assembly.

- Remove remaining bolt from each side of the grille. Now you can lift grille assembly out of vehicle.

Remove –or- Trim plastic shroud below radiator. There are Christmas tree clips that hold it tight under the radiator (these can be difficult to access). You can use a razor blade or 3.5” holesaw if this will be retained.

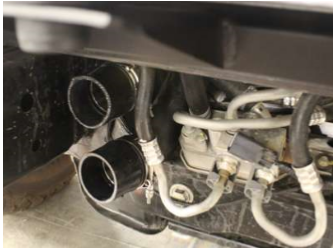
- Unbolt shutter system for intercooler: four 8mm bolts hold it in place. Two on the top that go into the frame rail, and two that are accessible by removing the black plastic covers on the Front Bumper. Unplug motor for shutter system, unplug fans. Unbolt two 13mm bolts that hold the upper aluminum intercooler support to frame.

- For vehicles equipped with Skid plate, unbolt and remove skid plate below vehicle

- Unbolt lower factory intercooler support. Remove factory intercooler and CAC cooling fan from vehicle. It may take some effort to get the intercooler inlets/outlet out of their couplers. Do Not Lose Rubber Intercooler Isolator Bushings – these will be reused.

- Loosen clamps holding the 2 blue couplers to factory charge pipes. Unhook BOV recirculation line from

- Next, loosen the clamp for the throttle body pipe to intercooler connection on driver’s side. Loosen the clamp at the silicone coupler instead of removing the clip that holds the plastic elbow to the intercooler.

- Remove CAC.
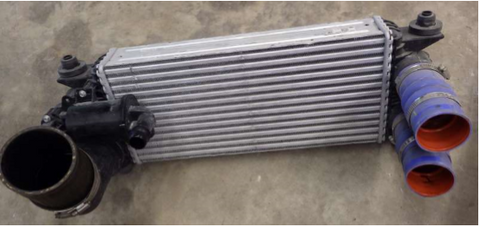
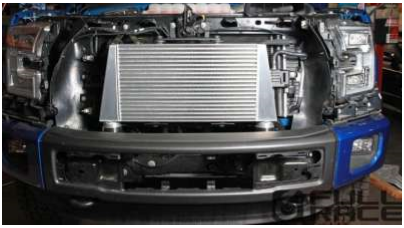
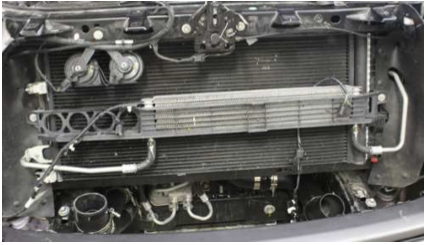
- Install Full-Race intercooler mounting beam in place of OEM intercooler mount - reuse OEM hardware.

- Install all four factory rubber intercooler isolators onto Full-Race intercooler. Set Full-Race intercooler onto mounting Remove bolts from hood latch, install included hood latch bracket onto Full-Race intercooler and bolt in place.


- At this point the Intercooler should be installed in the truck and ready for charge piping to be connected.
- Unplug TIP sensor from factory throttle body pipe and unhook EVAP hose fitting. To disconnect the EVAP fitting pinch the two exposed tabs while pushing down on them. Loosen both clamps on the throttle body coupler. Remove throttle body pipe from vehicle.

- Transfer TIP sensor to new throttle body pipe with supplied bolt. Loosely install supplied 3” straight coupler and two 3” T-bolt clamps onto throttle body.

- Install supplied 2.5” couplers and T-bolt clamps onto factory hot pipes on passenger side of truck - these are the ones that had the blue couplers on them. Then install the supplied Y-pipe on the passenger side of the truck. Do not fully tighten yet.
2017+: Install 3” 45 couplers and T-bolt clamps onto the supplied Y-pipe and BOV pipe.

2015-2016: Install 3” Straight couplers and T-bolt clamps onto the supplied Y pipe and BOV pipe.

- Transfer the factory electronic BOV from the factory intercooler over to the BOV charge pipe. Use supplied bolt to fasten BOV to new pipe. Plug in E-BOV once installed in vehicle.

- Install throttle body pipe into truck. Install the supplied 3” hump coupler over the other end of throttle body pipe along with a 3” T-bolt clamp. Install intercooler outlet pipe. Align everything until happy with fitment.
Tighten all T-bolt clamps to 44lb.in / 5Nm. DO NOT OVERTIGHTEN CLAMPS, IT CAN CRUSH ALUMINUM CHARGE PIPES
- Remove shutter system from factory grille. There are 4 pop up clips on the top of the grille, 4 nuts on the backside and a lone bolt in the middle of the shutter system on the backside. It’s easy to start by prying the shutters out of the grille backing, then lay down some masking tape for your trim lines. Remove the motor for the shutter system, leaving it unplugged won’t result in a check engine light. Reference the photo below for how much to trim. You want to keep the post on the bottom tall enough so you can remount the ambient air temp sensor. You will cut an inch out of the bottom so this piece can fit around the new intercooler.


- Reinstall grille onto trimmed piece using the OEM hardware, minus the center bolt. Be sure to reinstall the ambient air temp sensor at the base of the trimmed piece.
- If relocating adaptive cruise control module for Aftermarket Front Bumper, remove unit from behind plastic trim piece on driver side of factory bumper. Install adaptive cruise module in supplied Full-Race bracket using supplied M8 bolts, and install onto intercooler using supplied M8 bolts. It will be necessary to route the wire and plug for the adaptive cruise control module behind the factory transmission cooler in order it to reach.for

- Double check that everything is tight, secure and plugged in. Remove factory E-BOV recirculation line from the bottom of the intake tube. Install supplied cap on intake tube using zip-tie or hose clamp. Reinstall grille assembly in reverse order of disassembly. Be sure to plug in all connections by the hood latch. Go over all work, ensure there is nothing overtightened or loose/disconnected before reinstalling grille, skid plate, grille, headlight surrounds, etc.
If you have any questions about the installation, feel free to get in touch with our customer service team. We’re happy to help in any way we can. At BumperOnly, setting up your ride is our pride.